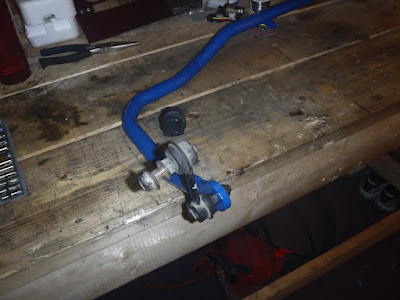
After being prompted by several forum members to look into how sway-bars work a little more, I found out that its not advisable to change one sway-bar and not the other, unless you want to modify the over/under-steer characteristics.
 |
| CMR 30mm Rear Sway-bar GTR and pineapple link bushings |
So, Naturally most cars come from the factory setup to have a little bit of under-steer, thats because in a high speed turn, even an inexperienced driver can handle under-steer, but not everyone would be able to handle an over-steer situation, cause over-steer would send the tail out and spin the car.
Well, so too is the Nissan Skyline GTR setup to come with a little under-steer from the factory, and I haven't made this problem any better by fitting the 9" wide rims in front and the 9.5" in rear, more traction from the rear + it's a rear-wheel biased AWD system, its a recipe for a huge amount of under-steer! Which I noticed pretty quickly at the track, it made the car pretty safe to handle since I'm still a novice track-day goer.
so, by using bigger/smaller sway-bars in the front and rear, one can modify the over/under-steer. For example; If your car is under-steering, and you wanted to help balance it out you would fit a stiffer rear sway-bar, the stiffer rear end will cause the tail to slide out more, effectively correcting under-steer.
So, when my car gets fitted with a stiffer front sway-bar, it would make it under-steer even worse! Not, what I needed at all, so I sent an email over to Adam in Japan and told him to find me a big after-market rear sway-bar, and a set of bushing kits for the end-links (mine are rather worn). He didn't fail me! CMR 30mm Rear Sway-bar with bushings and brackets, and a kit of pineapple bushes for the links.
So to put the whole thing in perspective, I measured the OEM sway-bars, and compared them to my after-market ones, heres what I found:
- OEM Front: 21 mm (Apparently hollow?)
- OEM Rear: 26 mm (Solid as far as I can tell)
- Cusco Front: 24 mm (Solid)
- CMR Rear: 30 mm (Solid)
So my front would see an increase of 3 mm, while the rear would see 4 mm, I think this is enough of a difference now between front and rear stiffness that my under-steer problem will be much better.
Installation:
The first step is to lift the car up off the ground, if your not sure how to do that, check out the How-To: Jack Lift the Car up, and support it with jack stands.
With the car safely supported on its jack stands, proceed to remove the wheels on all 4 corners, this will free up some working space for you. Then under the front of the car, remove your under-tray if you have one.
Now you can carefully unbolt the upper link assembly from the spindle on both sides.
Then, remove the front bolt like this on each side:
Followed by the nut, inside the front subframe:
It's at this point you should be able to free the front sway bar.
Comparing the oem, to the new Cusco swaybar to obtain proper orientation, and make sure the links get installed on their proper sides, in the correct direction.
Transfer the links from the Oem bar, onto the new bar.
Then, being super careful not to hold the bar upside while trying to install it (as it will only go in the one way, the proper way) you should be able to push the new bar into place. If you are having difficulty getting it to fit right, try using a jack to lift up the front spindles and put some force on the suspension, as to mimic load conditions. That may help make it easier to get the thing into position.
Once its in, just re-install the 4 bolts, and attach the links to spindles again. The reason we remove the links with the sway bar is that for the minimal amount of extra work, it affords us the opportunity to inspect the links for cracks and tears, and because its easier to install and remove them when you can work in an open space.
That covers the front swaybar, so onto the rear. First, unbolt the old rear links.
Then you're going to need to drop the cat-back exhaust.
Much like the front swaybar, there are 2 bolts on each side that hold the swaybar brackets to the subframe, 14mm bolts. remove them both and the oem swaybar will easily come free. Next, if you're using new bushings (and your should be) you need to rebuild the links with the new bushings, so remove them from the oem bar.
Now you can install them onto the new swaybar using the new bushings.
From there, its just a matter of re-installing those 2 bolts and brackets on each side, and then re-attaching the links to the lower tables. Don't over-tighten those little pine-apple bushings or you may crack them, we tightened them just enough to cause a slight bulge, which made everything nice and stiff.
That wraps it up, pretty simple procedure really.


Comments
running through the math real quick though you did end up softening up the front (relative to the rear) by .76%. thats just taking the front bar as a percentage of stiffness of the rear bar.
Hopefully this gives a little better perspective.
Post a Comment