This Guide will walk you through the key steps for pulling an engine from a car, whether you're doing a rebuild or motor swap, you'll see step-by-step how I removed this RB26 Engine and got it back together perfectly. The same method I followed here will make working on ANY car fool-proof!
Start by getting a note book, a sharpie marker, Ziploc plastic baggies and masking tape. There are so many connectors, nuts and bolts to keep track of when pulling the engine from the GTR, and believing you can remember where everything goes by heart is a foolish assumption for a first timer. I am assuming this tear down is down from a first timers perspective, so everything will be as detailed as possible. This is by no means the quickest way to remove the engine, nor is it 100% easier then any other way, but this is how I managed to get it done, It didn't cost me an arm and a leg, and everything worked perfectly once all was said and done.
 |
| Pulling an Engine from the car - Engine Removal |
The # 1 rule is: "If you remove it, or unplug it, you must record it". Simply put, this means when you disconnect any electrical plug, we label both male and female connectors, with any unique numbering code, then record the disconnection in the note book, to preserve the order in which things are taken out. This is to make life easier for when you put it all back together because you can just follow the note book, in reverse order. That way you know for sure you didn't forget something - I did it, and it worked for me. We apply the same principal to any nuts and bolts, or vacuum lines and hydraulic lines.
First of all...With, or without transmission?
It's a good question! and the answer is that it depends on your situation what you feel like doing, and what you have available in terms of resources.... For me, I was working alone, the transmission is heavy to try and drop, then move around by yourself working under the car with minimal clearance, even working with a jack can be dangerous down there... unless you have a tranny cradle... and on top of that the way to remove the tranny is special... you cant just un-bolt the bell housing bolts. First you have to remove the starter, which is very hard to do because its so close to the firewall at the back of the engine, it's hard to get a wrench on the 2 bolts that hold that starter in place. Once the starter is out to pull the transmission off, you have to pull towards the rear of the car about 5 inches, and rotate it about 60 degrees clockwise or c.c.w depending which way you look at it, and then it will come off.
Comparing the work and difficulty of doing it that way, I just decided to pull it out all in one piece... it's really pretty easy to do in one piece, just make sure your crane can support it! I had mine on the 3/4 setting, 1 ton.
Lastly, you'll need to unbolt the transmission bell-housing bolts before the engine will come free of course, so you need like 3 feet of extension for your ratchet in order to get the bolts on the top side. If you feel like you want to leave the transmission in the car, its totally do-able, taking the engine out/in without the transmission attached is even easier than with, of course.
Tools: You should have access to a basic supply of mechanics tools, including a jack, jack stands, wrenches, ratchets, screw drivers, work light, plenty of rags, buckets for fluids, etc... We used a 2 tonne engine crane set to the 1 tonne lift position. First thing to do is make sure you have a clean floor space and a large enough working area, placing some flattened cardboard boxes underneath the car makes it a lot more comfortable, and easier to spot a dropped nut or bolt. If your car is as low as mine, you're going to need to drive up onto some 2 x 6 boards in order to fit the jack under the car. once parked, with parking brake securely on and locked you should have enough room to slide the jack down the front middle of the car. Just behind the oil sump, there's an indented X on the front sub-frame, this is the forward jacking point.
Before anything else remove the fuel pump fuse from the interior fuse panel, and try to start the car. It will most likely start, run for 30 seconds then shut off, try to start it one more time until it won't fire anymore. The fuel lines are now empty. Lift the car up high enough to place 2 heavy duty jack stands under each of the front sub-frame points, located just behind each of the tension rods. We'll be moving the jacks a little later on, but this is a solid point where they won't slip from to start with.
 |
| Removing the Front Grill, Bumper and Hood to Gain Access to the Engine |
At the rear of the car, the rear sub-frame or rear differential makes equally as good a jacking point, again 2 more jack stands on either side of the sub-frame, just to support the car safely. Follow this Guide on How To Properly Jack Up your Car. From here, we remove the wheels. (If you don't know how to remove the wheels from the car, then most likely this job will be over your head). Once all 4 wheels are off, we have a lot more room to work underneath the car.
Now that everything is ready, we begin by removing the hood, we don't want to damage it while we're working in the engine bay. It's simply 4 bolts, two on either side, where the hood hinges connect. Then we go under the car and remove the under-tray, these steps are really trivial, all the bolts are very visible and removal of these components is straight forward as can be. Following the under-tray remove the corner turn indicator lights, these are held in by 1 screw on top, which screws the black plastic arm into the body of the car, then in the bottom corner there is a sort of plastic "ball-joint" style clip. The clip can be released by prying the entire housing forward with a flat head screw driver, and it should just pop right out, lastly disconnect the electrical connector and don't forget to mark and label each piece, and record it in the notebook.

Now we remove the front grill, which is held in by 4 grey plastic clips, these clips can be squeezed from behind by hand or with pliers, and they should just pop out, sometimes they get stuck and need a little coercion. At this point we're ready to remove the front bumper, there are three plastic screws in the middle, right below where the grill was. Then there's one screw in each of the wheel wells facing forward attached to the fender liner, and as assortment of screws underneath and around the inter-cooler opening. There's 2 more screws in the vent holes on the sides of the bumper as well, facing up.
Disconnect the battery and remove it along with the battery tray.
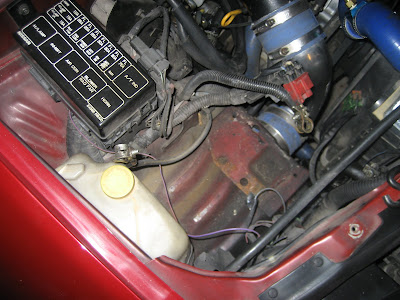 Now onto the intakes, its pretty much the same principle whether you have an induction kit or standard air box. Unscrew all the brackets and mounting hardware, loosen the hose clamps just before each Mass Air Flow meter and remove the whole induction system as one piece, Disconnect and label accordingly which MAF wires goes to which (front or back) MAF.
NOTE: See all that nasty grime, dirt, oily gunk all over the engine bay? That doesn't NEED to look like that, and it's actually very easy to clean it up, take a look at this Comprehensive Guide to Cleaning up Your Engine Bay & Wire Tucking.
 Then the "Twin Turbo" Top pipe can come off by loosening the hose clamps on either end, and removing the two bolts that attach it to the front turbo inlet pipe. Most of these pipes and tubes require a fair amount of elbow grease to convince freedom, and some will require a flat head screw driver to break the seal. If you've ever wondered why some people split their TT pipe welded down the middle, take a look at this article.
 Now the HKS hot side upper piping, and the upper re-circulation piping can easily come off by loosening the hose clamps. The re-circulation Y-pipe has one screw holding it to the body that needs to be removed.
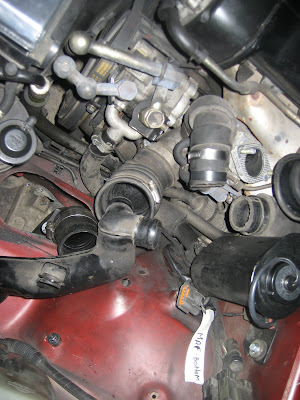 The lower recirculation piping rubber hose and the HKS hot side lower piping can now be removed again by just loosening the hose clamps and wiggling the pipes out of place.
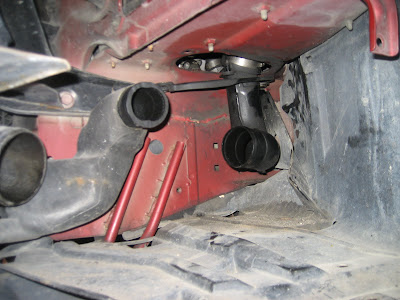 Then take off the front turbo suction flex pipe, which is held on by one hose clamp.
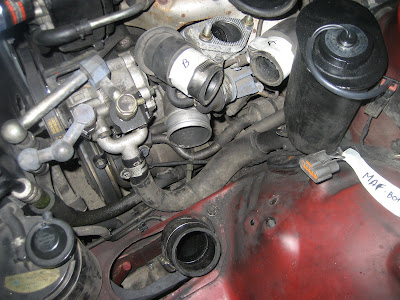 ...And finally took off the rear turbo suction flex pipe, again it is held on by one hose clamp but sometimes due to the tight space and possibly bad orientation of the hose clamp, this can be difficult to do.
 The more of the pipe work we can remove in the beginning the easier it makes life later on. We need to have as much visibility of everything that we can, also the more we remove the less we risk damaging when the time comes to pull the engine out.
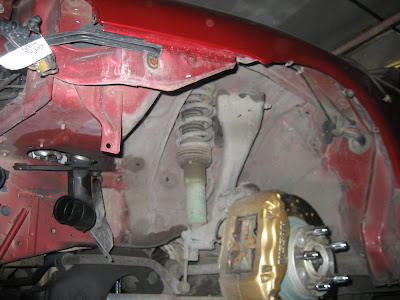 Continuing with the tear down, I removed the passenger side fender liner to facilitate removal of other things later on. It's only a few rather visible plastic push pins that hold these liners in place, along with a couple of screws. It gets very dirty in the wheel wells, so I made this guide on Chassis Rust Prevention and Protection, the result is a beautiful strong black finish.
 This is the pipe that connects to the recirculation Y-pipe inside the engine compartment, if you plan to eliminate your recirculatory system then this piece can be thrown in the bin, and we'll cap the part in the engine bay later on.
 Then I pulled the drivers side fender liner, which will be necessary to unbolt the axles later on.
 At this point the front mount inter-cooler was able to come free. It's held in place by 3 bolts which hold it from the bottom onto the plastic re-circulation piping. Once unbolted it slides outwards, and drops out of it's upper mounting bushes.
 After the inter-cooler has been taken off, the balance pipe for the Blow Off Valve recirculation system can be removed along with the HKS lower cold side piping.
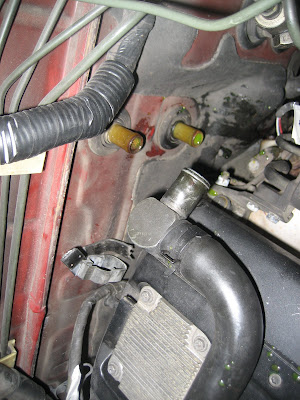
 Now you can remove your Blow Off Valves. The ones pictured above are aftermarket Blitz units, take a look at this article on How-To rebuild Blow Off Valves. The whole set up can be removed by disconnecting the two vacuum lines, unbolting the support beam that connects in the middle, and loosening the hose clamps.
 After some careful manipulation of shimmying the pipework back and forth, the HKS upper cold side piping finally came free, essentially completing the job of removing all components of the intake system.
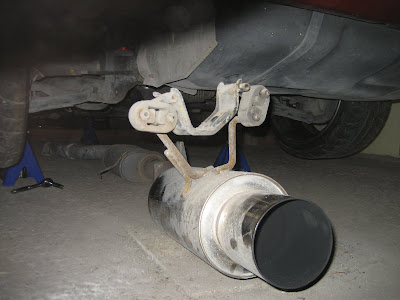 Usually it's only necessary to disconnect the downpipes, but it makes things easier for working around the transmission later on if we just get the whole exhaust system out of the way, check out this write up on How-To overhaul and clean up the Exhaust System. It's held up by a few easily visible hangers and rubber bands. Removing the bolts at the front of the catalytic converter pipe is a good place to separate this. Once it's dropped to the floor, you can just pick it up and slide it off to the side.
 This downpipes is really very hard to remove, I didn't have a 1/2" extension long enough and I couldn't get enough torque out of my 3/8" drive ratchet, but after some lost skin and scraped arms, I was able to get it free. It's held on by four nuts, 2 on either side of each flange. This is easiest to remove from under the car.
From above the engine, you can reach in and undo the upper radiator hose clamps and then pull the hose right out. From under the car it's easier to reach the lower radiator hose and remove it as well. The next step is to remove the radiator, standard of aftermarket the process is the same. First drain the coolant, to accomplish this, place a bucket under the passenger side of the radiator, and remove the screw plug from the bottom corner of the radiator, all the fluid should drain out. Removing the radiator cap will be necessary to get the vacuum seal broken and make the fluids actually drain. Also if you're running an aftermarket water temperature sensor, you'll need to disconnect it now, as it will usually be placed in the upper radiator hose.

Then, once the fluid is all drained, and the upper and lower radiator hoses are free and clear, remove the two radiator support brackets by undoing the 2 nuts on each side. With the brackets are off, the radiator should just lift straight up and out.
I'd placed all the wiring for the Defi boost and water sensor under the hinge for the hood, this would keep them out of the way, and prevent them from getting damaged.
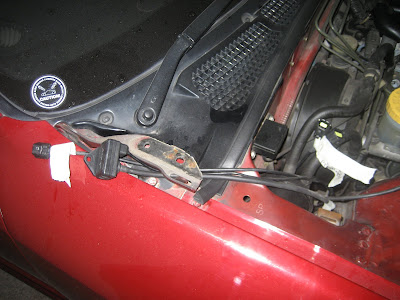 Now I started on the electrical and vacuum line connections. There are quite a few so it's best to be vigilant with your labels here, and not leave them until the end. So I disconnected the other two Defi sensors oil temperature and oil pressure and place them under then hinge as well.
 The throttle cable comes off by applying throttle and just pushing the metal stopper on the end out of the arm, once free it'll be disconnected.
At the same time, disconnect the 2 rear vacuum lines that go to the clutch booster and the brake booster.
 Finally we come to the main engine harness. This wasn't difficult at all, just took some time to label both parts of every connection and mark it down in my book. Start by unplugging the Cam Angle Sensor in the front, then the grounding points and 2 other sensors by the upper radiator hose neck. There are 3 screws that need to be removed from the black plastic fuel injector bezel, then all the injectors can be unplugged. Check out this guide I made that takes A Deep Look Into Fuel Injector Cleaners, Cleaning and Flow Testing (with Video). The fuel injector clips are rectangular pieces of metal, you need to pry them free very carefully as they can break or get lost way too easily. There are a few more connections near the last injector at the rear for the Throttle Position Sensor and lastly the Ignition Amplifier connector. Once everything is free, you can tuck the harness under the window wiper to keep safe out of the way.
On to the exhaust side of the engine, you'll need to disconnect both Oxygen Sensors, and keep note of which one is the front, and rear turbo, as orientation does indeed matter.
 Then it was just a matter of finishing up by unplugging and labelling all the vacuum lines on this side, there are a number of small ones so be diligent with labels.
 Take the radiator fan off the water pump pulley to gain a lot more room for working in there. It's only 4 small nuts to take it off.
Loosen the power steering belt, by turning the adjuster bolt, it's the really long one, you'll know it when you see it, its accessible from the side, and then slip the power steering belt over the pulley and remove it. There's one bolt at the rear of the power steering pump that allows it to swivel and another bolt that you access through the hole in the pulley facing frontwards. At this point the power steering pump should swing free and clear.
 We take off the power steering pump while leaving the hydraulic lines attached so that we wouldn't have to bleed the system later. Using some zip ties you can strap it to the frame and keep the pump well out of the way.
The brake system is very easy to remove and mostly trivial but I will give a brief walk through of that just in case you haven't done it before. We start with the caliper, remove the spring clip and the 2 pins that hold the pads in place, now with your fingers or pliers slide the pads out through the top of the caliper. The goal is to remove the calipers with out having to bleed the brakes later, this way we avoid getting that corrosive brake fluid everywhere.
There's 2 large bolts that hold the caliper in place, remove them. Then remove the screws from the brake line brackets so that everything can now move freely. It takes a little bit of fine maneuvering to clear the caliper and not damage the hard lines, but if you take your time it's do-able. Once the caliper is off, the rotors will just slide right off the spindle, and that's it, front brakes are off.
Now we proceed to remove the front shocks, essentially this is only necessary to do to the drivers side, how ever to keep things simple, I applied it to both driver and passenger side. Typically it's easier to leave the passenger side steering assembly intact and only unbolt the 6 bolts at the front drive shaft it self. So if you can do that, then do so, otherwise we start this part by removing the two nuts on top of each shock tower, these hold the shocks in place so it may drop when you remove the nuts. For each step, repeat on passenger's side too, unless you're taking the short cut mentioned earlier about the 6 bolts.
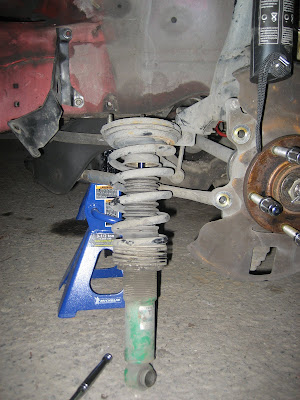 Lastly, there is one large bolt in the bottom that holds the shock to the spindle, once this is undone, the shock should come out freely. We now move on to the tension rods. These dirty and banged up shocks and rods don't need to look like this actually, look over this Detailed Guide on How to Restore Steering & Suspension Parts.
 The tension rods are held in place by 2 nuts that go through the lower control arm, and one bolt through the front sub-frame. I always suggest that you put the bolts and nuts you just removed, into the piece for which they belong. That way there's less of a chance to mix up parts.
At this point it's a good idea to remove the ABS sensors from the spindles, they're held in by one screw and just pry out with an Exacto knife, you can tell what they are because they have 2 sections of rubber hoses protecting the wires. Keep the sensors clean, they work on a magnetic detection system so don't damage the magnet. Now we disconnect the front sway bar links. Don't ever use an impact gun on suspension components as you risk seriously damaging them. These can be undone just from loosening the bolts, very easy.
 From here it's onto the the upper control arms, mine are AMS adjustable, standard are a solid black bar. There are 2 nuts and bolts, one on either end, just loosen the nuts and pull the bolts out. By pushing the spindle arm outwards you can free up the arm and take it out.
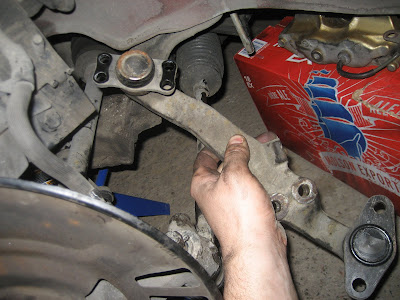 To remove the lower control arm start by removing the 2 nuts from the bottom side of the spindle, then the arm should be more free to rotate about. There are 4 nuts that hold the inner ball joint in place, removing the nuts off both ball joints saves using a bass joint separator.
 The last bolt to remove before the axle will come free is a 36mm axle nut, it's locked in place by a cotter pin that needs to be removed (Cotter pins should never be re-used, for the cheap cost throw out old ones and buy new ones, it's just safer). I had to soak it in WD40 over night before it came off easily with the impact gun the next day.
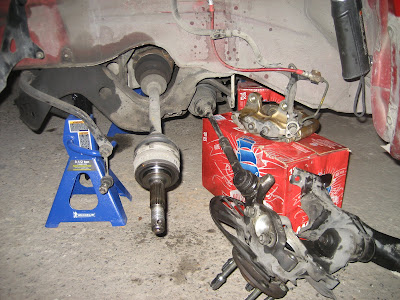 Once all the control arms were disconnected, I pulled the whole spindle off, and now the axle is ready to come out. I decided to leave the tie rod attached because it didn't come off easily, and I didn't want to damage it, its fine there anyways, as long as it's out of the way. Now you can see the spindle on the floor, tie rod attached (remember to support it so it doesn't break the tie rod end) and the brake caliper supported behind that.
At this point we passenger side front axle can be disconnected, if you look on the rusty part near the engine, there is a hexagonal face with 3 sets of two bolts. Six bolts in total that hold this axle to the drive shaft, removing those 6 bolts frees the passenger side axle.
 The drivers' side front axle requires a trick to remove it. From under the car you can see a small notch cut into the axle just near the front differential. Placing a flat head screw driver into the notch, and prying outward, while pulling and rotating the drive shaft will allow it to come free, it definitely takes a few minutes of fiddling with so don't rush it or force it, it really should just pop right out when you hit the sweet spot. Don't yank it all the way out as you will get covered in differential fluid. If you cannot remove the axle no matter what configuration you try, you'll need to remove the front differential cover, once open you can see a circlip that holds the notch in place, its easy to unclip it this way, but now you must re-seal the front differential.
 Once its out, a small red stream will run for like 30 seconds, this stuff is pretty thick. It's not a big deal but don't let it get on the car or on the floor, its pretty corrosive.
 Next I wanted to get the AC pump ready cause it needs to be free when the motor starts to come up and out so that you can jimmy it around. Also this way I don't have to empty my AC system. It's held on by 4 bolts, 2 accessible from above, and the other 2 from under the car.

We're getting very close now to having the engine out, there's just a few more connections to undo now. So now label accordingly and disconnect the remaining vacuum lines, theres about 4 or 5 near the front side. Then if you can reach, disconnect the hardness from the alternator. There's a large ground wire that goes from the chassis to the engine mount bolt, and then to the alternator itself. There's also a large power wire that goes to the alternator and to the starter motor, but sometimes those are easier to disconnect as the motor is on its way out. At this point you need to disconnect the fuel lines which you should have already drained at the beginning. It's as easy as loosening the hose clamps and wiggling the hoses free and off the filter and return line fittings.
 There are 2 water heater hoses, an upper and lower connected to the firewall just to the rear of the engine, these will most likely still be full of coolant so prepare a bucket as you remove them.
 Now we move under the car to address the connections around the transmission. Remove the 4 nuts and bolts that hold the rear drive shaft to the transmission as shown in the picture below.
 Then remove the clutch slave cylinder by undoing the 2 bolts that hold it in place. *NEVER press the clutch pedal while the slave is out in the open, it will force the actuator out of the slave and you will need to buy a new one*
 Next is the Vehicle Speed Cable, this should only be finger tight, but loosen it by what ever means necessary as it must come off, check out this write up on How-To Replace the Speedometer Cable. Take care to not allow dirt on the cable or inside the fitting on the transmission.
 Now we address the All Wheel Drive system, we unbolt the 2 bolts holding the ATESSA pump in place, and using an exacto knife we can break the seal with the transfer case. As you pull the pump away from the transfer case rear, be sure to have a bucket ready as all the transfer-case fluid will come out now. Be careful to pull the actuator nipple out of the hole so you don't drop it in the dirt later, and take note of which position is forward facing. You can see the actuator still in the box in the center of the hole in the picture below. I recommend placing bags over all sensitive parts so they don't become contaminated with dirt.
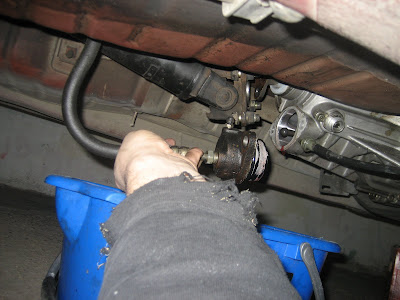 Now it's time to drain the engine oil, simply unscrew the drain bolt from the bottom of the sump and allow some time for the oil to full drain out. It's not essential to drain the oil exactly at this step, you can do it when ever you like, or not at all if theres no need to.
 From the inside of the car you will need to remove the center console surrounding, then unscrew the gear knob just by turning it counter clock wise forcefully, it will come off. Now you can slide off the gear shift leather gaiter, and you should see a black rubber boot over the gear knob base, it's held in place by 4 screws, one in each corner, then another smaller boot held in place by a zip tie. Simply cut the zip tie and remove the rubber boot. Then you'll see a circlip you need to remove, once the circlip is out, the whole gear shift assembly just slides right out and your result is the same as the picture below. Don't forget to put a bag over the top of the hole as you don't want anything at all going into the transmission!
 Now we're pretty much ready to take the engine out.
The only thing left to do is unbolt the 4 transmission mount bolts and remove the cross member. Of course you'll need to support the transmission with a jack at this point. Then its just one nut on each side for the engine mounts, the engine mount nuts are accessible from below through a hole in the side of the front sub-frames, you won't believe how easy they are to get to. Then we rigged up our crane with two large hoops of 7000 pound test cables. Obviously your crane system will be different than mine, but make certain you're operating safely and not to damage anything.
Also, the jack stands were in the way so they had to be moved from the front sub-frame to the front lower radiator support, which doubles as a cross chassis frame tie. It's strong enough to support everything. Then you need to disconnect the remaining electrical from the alternator, a plug at the bottom of the steering rack and the wiring to the starter motor and the 2 transmission sensors.
 With the crane all set up and everything freely able to move, we start the process of lifting the front and at the same time using the jack under the transmission to lower the rear end of the transmission. The goal is to angle the engine leaning backwards as that's the only way it will clear the radiator support bar with the transmission still attached.
 It's a very tricky game to get the balance just perfect to clear the pipes below and the firewall above and all the other things in the way, but take it slow. Honestly they whole process of moving up, over, down and out over and over again is very tiring and it takes a while, so be patient and just do it right.
 In the picture below you can see where the jack stands got moved to. Also note that we had to remove the front re-bar because our crane couldn't reach with it in the way. It's simple enough to remove, 2 bolts on either side and it slides out forwards.
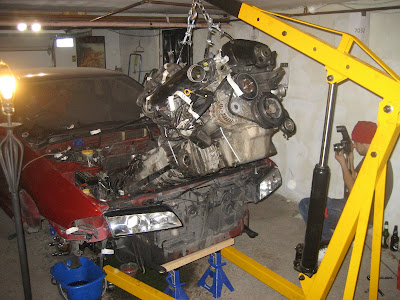 Just a little more and it got jammed on the upper rad support... So we put a jack on the front and actually lowered the body of the car to make it clear... and that still wasn't enough to clear it all. So we ended up lifting it out ourselves, be very careful doing this, make sure you have help around, it is heavy.
 The engine should be out, free and clear now. Congratulations.
 Another picture of the engine out. After doing it the first time I realized just how easy it actually was to pull the motor. But you've got to take your time, and make sure you don't break anything.
To separate the transmission from the engine is pretty straight forward as well, 4 small nuts and bolts hold the forward prop shaft in place. After the 4 nuts are out you can literally pull the shaft forwards and it will slide out of the transfer-case.
 After the prop shaft, there are a number of forward and rear facing bell housing bolts. With the whole thing out of the car, it's very easy to see the bolts. start by removing the 2 for the starter motor, which should then just fall out of place easily and you can finish off the remaining bolts.
Once all the bolts are out, there is another trick to remove the transmission. You will need to slide it back as much as possible, and rotate it 45 degrees while pulling. Eventually it will unlock and be able to slide right off. Take care to not damage the clutch or transmission input shaft in the process.
 Separating the transmission is very difficult to do by yourself, but I managed to handle it after a few hours of wrestling. Again I recommend doing this with a partner or you risk hurting your back and pulling muscles.
With the engine out, you're now ready to strip the engine and start the overhaul process; so check out this write up on How-To Strip, Overhaul and Rebuild the RB26DETT Engine.


Comments
Thanks man!
Post a Comment